We are happy to introduce Invoke-ADLabDeployment: a PowerShell project that helps you to quickly deploy a virtual test environment with Windows servers, Windows desktops, Office, Active Directory and a networking setup with multiple broadcast segments, all running on your local Hyper-V environment.
It is an in-house developed tool that we use heavily during our red teaming engagements. We use this to quickly spin-up lab environments that resemble the target environment. This way we can better develop and test our attacks, as well as investigate what artefacts we might leave behind.
We feel it is time to give back to the community and allow other red and blue teams to benefit from this. You can read more about its functionality and why we developed this below. Or you can go straight to the code and manual on our github.
Background and goal
During our red teaming engagements, we encounter many different setups. To test our attacks and to know what trails we leave behind, we need to test in setups that mimic the client’s environment as much as possible. But we never know what exact environment we will encounter. It could be all Win10 desktops with Office 2016 and 2016 servers, it could be Win7 with Office 2010 and 2008R2 servers, or it could be any combination of those. Also, x86 vs x64 can make a big difference for our payloads.
We prefer more time for hacking and less time for deploying test labs. The old method of manually cloning prepared virtual machines, manually go through the networking and AD setup, manually install Office and other client-side tools….sigh…its time consuming and error prone. And if you become sloppy by using older test machines, you might expose yourself with poor OPSEC.
This is where Invoke-ADLabDeployer comes in. It does the heavy lifting for you. In a matter of minutes, you have a freshly deployed lab with multiple Windows systems, ranging from Win7 to Win10, Server 2008R2 to 2016, all domain joined, with Office version 2010, 2013 or 2016 installed, alongside other client-side tools you want installed, as well as a networking setup with multiple broadcast segments. Its not a fixed test lab; you define the exact lab setup in a config file.
Differences with other tooling
There are other projects out there that do somewhat similar things. We reviewed those with our specific demands in mind. We need something that:
- Allows us to mimic the client’s environment as much as possible.
- Is relative lightweight in code base and we can easily add functionality to if required.
- Has support for all Windows OS versions currently encountered at clients, specifically support for as old as Windows 7 and Server 2008R2.
- Can deploy Active Directory, and have systems join it.
- Can install Office 2010, 2013 and 2016.
- Can install other client-side software.
- Can deploy multiple subnets so we can test network level attacks while not putting everything in the same broadcast segment (keeping it like real target networks).
- Keeps resource usage low.
- Is able to deploy large number of systems, e.g. from 1 to 25.
- Is cost efficient.
We searched for other solutions. But we found none that fitted our exact requirements. There are a few other PowerShell projects for test lab deployment like AutomatedLab, ws2016Lab, and Lability. And they are awesome for things that they are developed for. But for our goal they either have a lot of dependencies, huge code bases, don’t have support for as low as Win7 and 2008R2, or require all labs to be deployed via DSC, which doesn’t provide the flexibility we want.
There are Configuration Management tools like Ansible and Puppet, but they don’t deploy operating systems and networks or they do in an unfriendly way. There are Image Deployment tools like WIM and PXE boot, but they are lacking options for dynamic post deployment configuration. We could do snap shots of virtual machines. But this requires many manual steps, which is time consuming and error prone.
Of course there is also cloud computing, which some think would be excellent for this usage. Well, we think the downsides are too big. We could only find Azure and AWS that do any mature form of Windows deployments. But they don’t really do client Windows versions (Azure can do with expensive subscription), don’t really allow you to decide the exact patch level of your systems, do very icky things on the network level (multicast and broadcast are non-existing in the cloud) and it can become very(!) expensive if you deploy a larger network.
So, whatever solution we chose, we would still need to either script on the base OS deployment phase, or script on the post deployment phase. We could combine solutions. But after a quick try we gave up crying as the number of extra tools required and overall overhead was just insane.
It seemed we needed to develop something easy and lightweight ourselves. And when you think of it, its not that hard to do what we want to do. Especially when you are using modern Hyper-V with its many smart tricks applied to keep resource usage low, like differencing disks and dynamic memory.
Technical requirements
Invoke-ADLabDeployer relies heavily on Hyper-V, sysprep and (remote) Powershell for the deployment and configuration. It runs on a local Windows host with Hyper-V. In our lab we are using an Intel Skull NUC with maximum RAM running Server 2016. It does the job perfectly for our usage.
You may try running it on older Windows version. Just make sure to install WMF5 or later on your host node. For the guests you don’t need PowerShell 5: an important design decision for us was to support as low as PowerShell version 2 for the deployed machines. This in theory would make it also able to deploy 2003 and XP machines. We have not tested this yet.
Base image preparation and usage
Before you can deploy your first network, you need to have base images prepared. The script does not do this for you. Some other tools do this for you, and I may include this in future versions. But at this moment you need to create the base images yourself.
This base image preparation means you create a new virtual machine, install the Windows version you want on it, update to the level you want, enable remote powershell, do other customisation you want all your future deployment to have, and you power it off using a sysprep command. You do this for every base OS you want in your library. This task might take you a few evenings to complete, of which the installation of Windows updates takes the most time. But as I’ve included the correct unattend.xml files in the repository, you can skip at least the endless hours of debugging sysprep 🙂 Check the readme on our github for a detailed walkthrough of this very important preparation.
Running Invoke-ADLabDeployer
When the base image preparation is done, all you need to do is:
- Define the lab in a XML config file
- Import and run Invoke-ADLabDeployer
- Wait a few minutes
The XML config file defines the details of the networks, the systems and the setup of Active Directory domain. The settings for the network and ADDS are pretty straight forward.
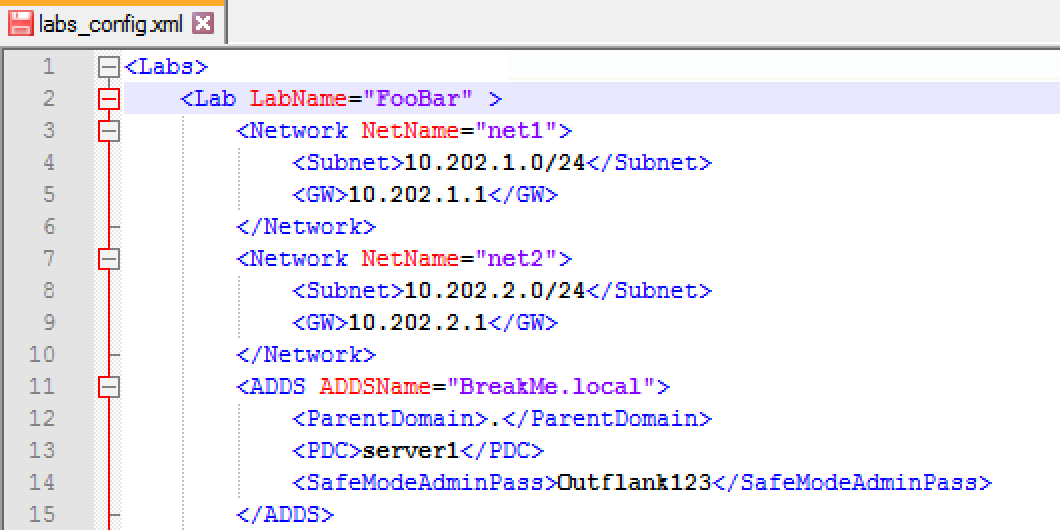
Invoke-ADLabDeployer config of network and AD
In the config file you also define what systems you deploy, and how they are configured. Here is an example of 2 systems: “server1” is an 20012R2 machine that will be running the Domain Controller (as defined in the ADDS section), and “server2” is a non-domain joined system. Both install Chrome, 7zip and Notepad++, but server2 also wil have a file copied (the installer of Microsoft ATA).
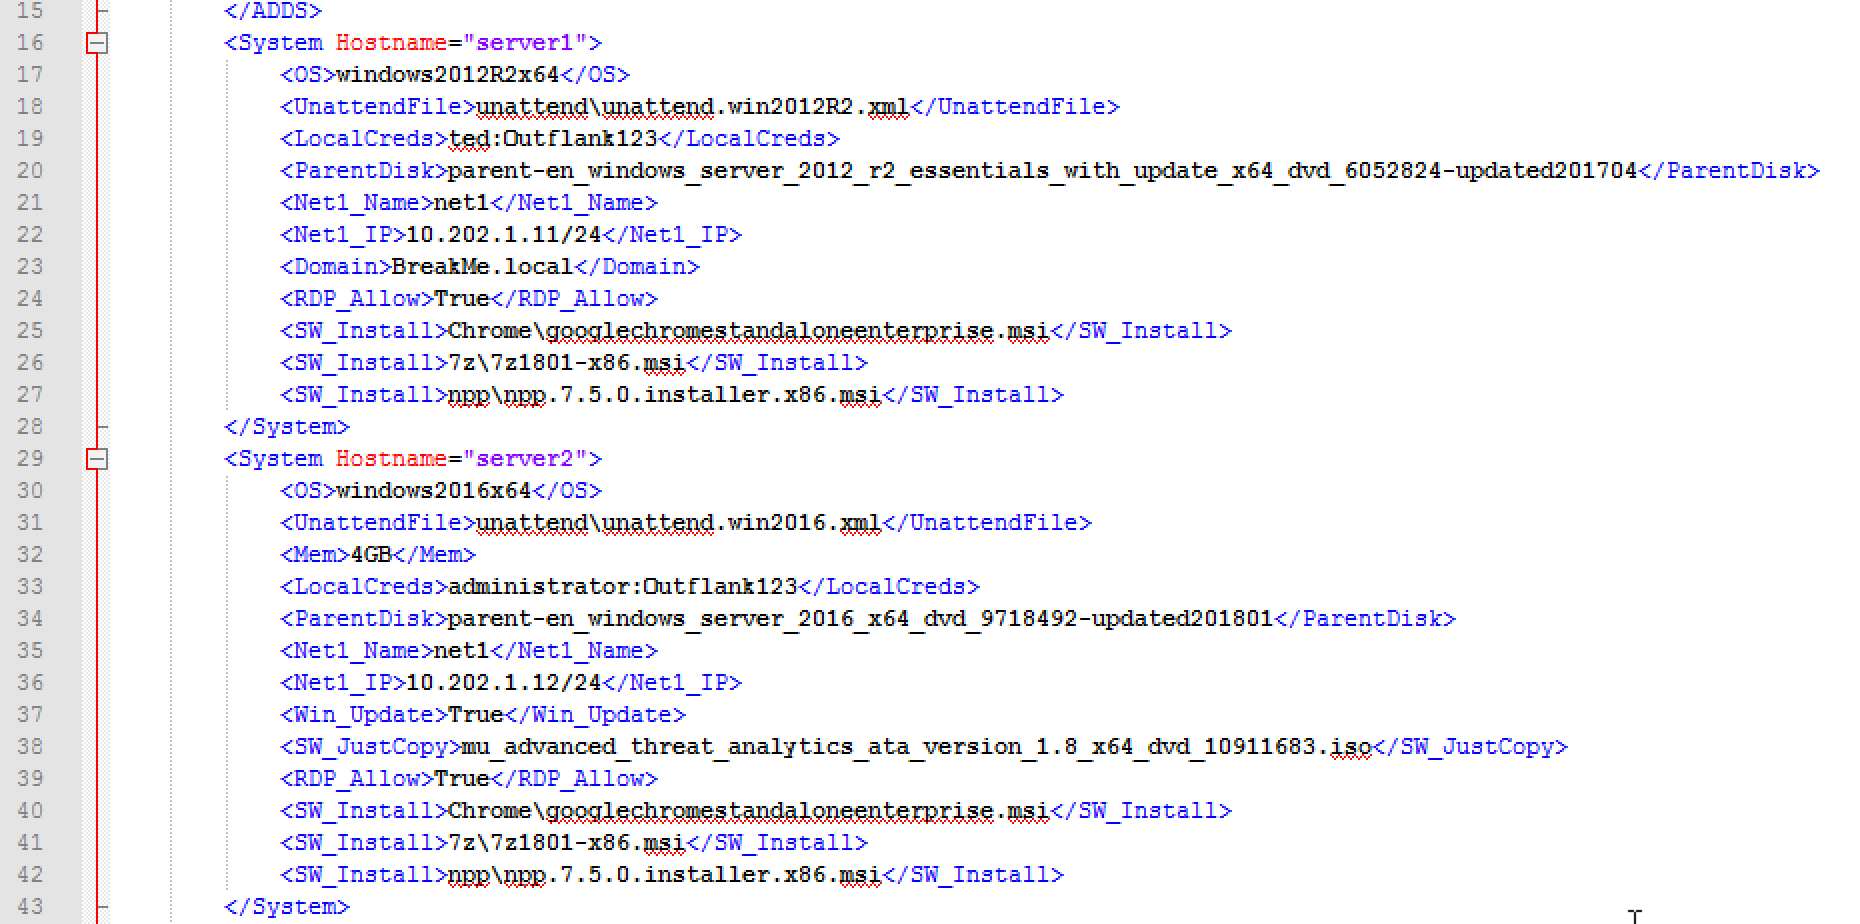
Config of 2 servers: ‘server1’ and ‘server2’
There are many more options you can use in the XML config file to automate the tuning of systems. Yo can find all options on github. But I would like to point out 2 more to give you an idea: <SkipDeploy> and the installation of Office.
<SkipDeploy> is a tag that you can insert per system allowing you to keep the system config in the file, but not have it deployed. This makes it easier to use the same config when you only want to deploy a subset of systems.
The automated installation of Microsoft Office is done using the <OfficeInstaller> and the <OfficeConfig> tag. OfficeInstaller points to the actual installer EXE copied from the contents of the Office ISO. The OfficeConfig point to the config file required for automated Office installs. I’ve included these Office config files in the repository.
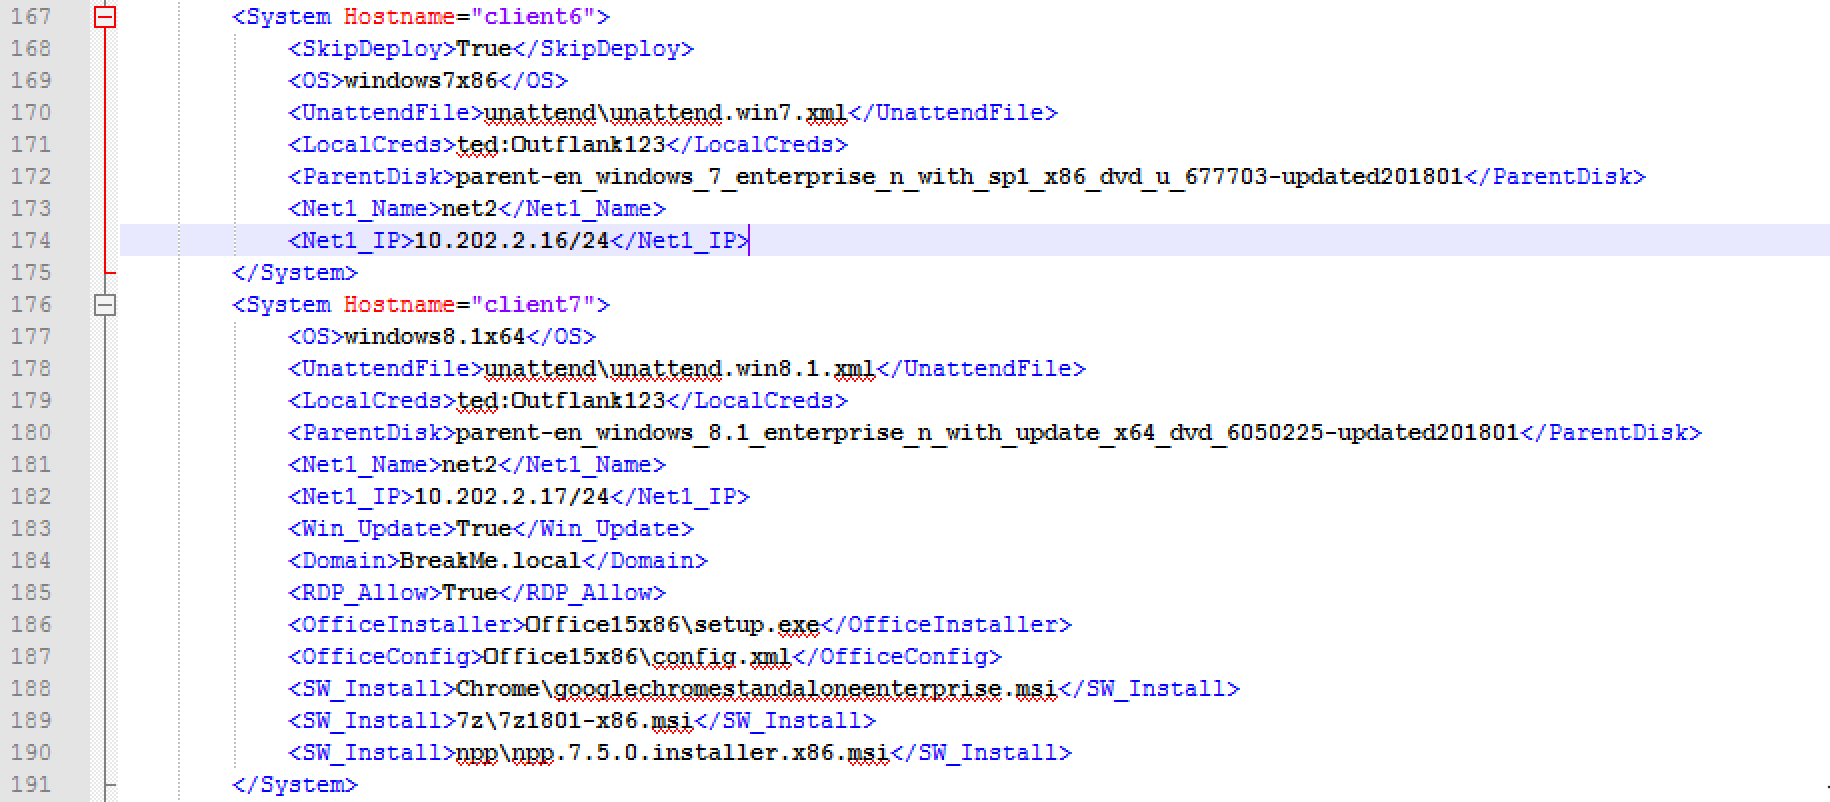
Config options SkipDeploy and for the installation of Office
You can test the config file by running with the -CheckConfigOnly parameter. It either tells you the errors in your config, or it will present you with an output similar like this.

Checking the config
You can catch the output in hashtables and go through all the details of the config if you want.
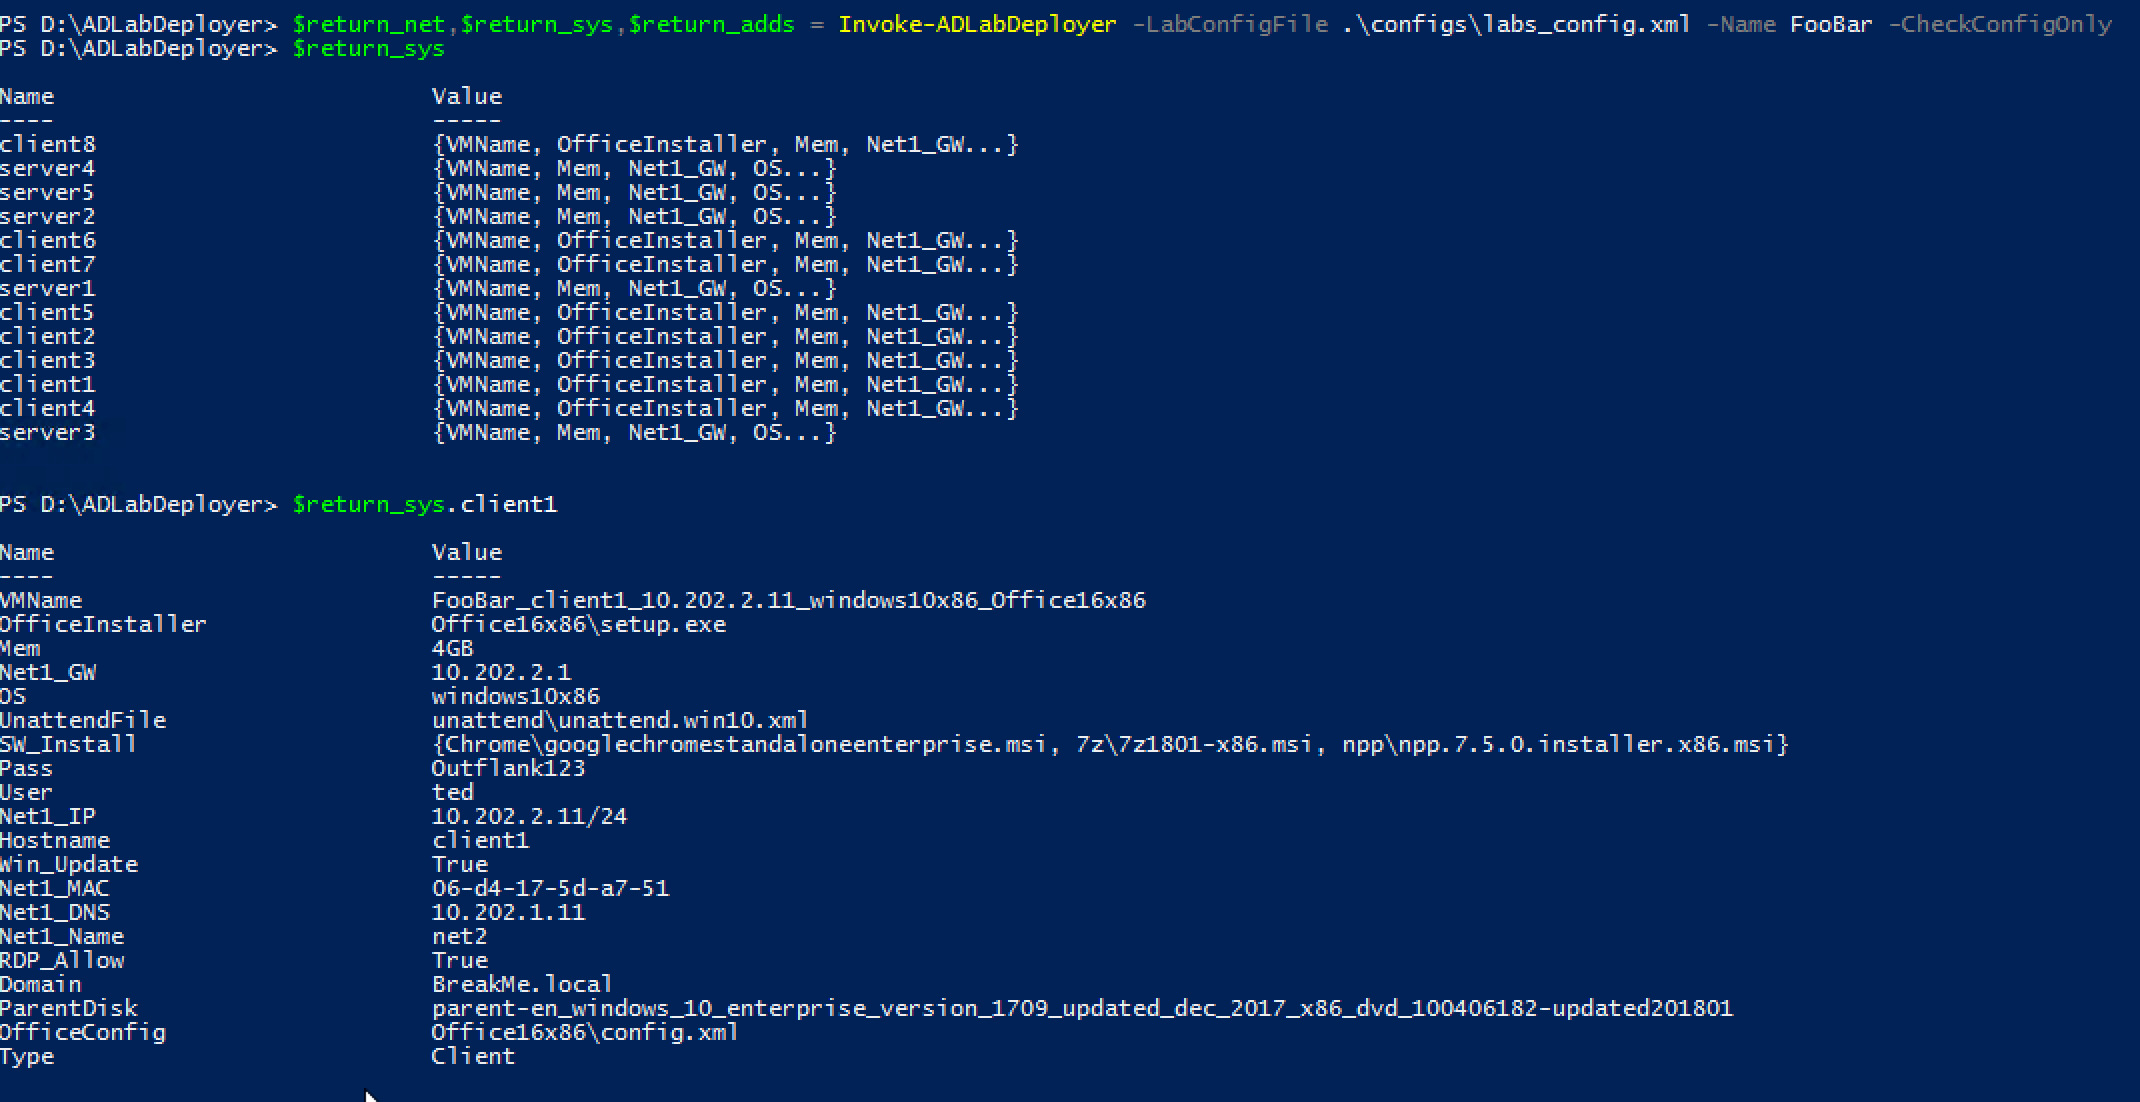
Checking the config with local hashtables
When running the script you will get an output similar like the following screenshots. First it will read the config and create the networks and systems.
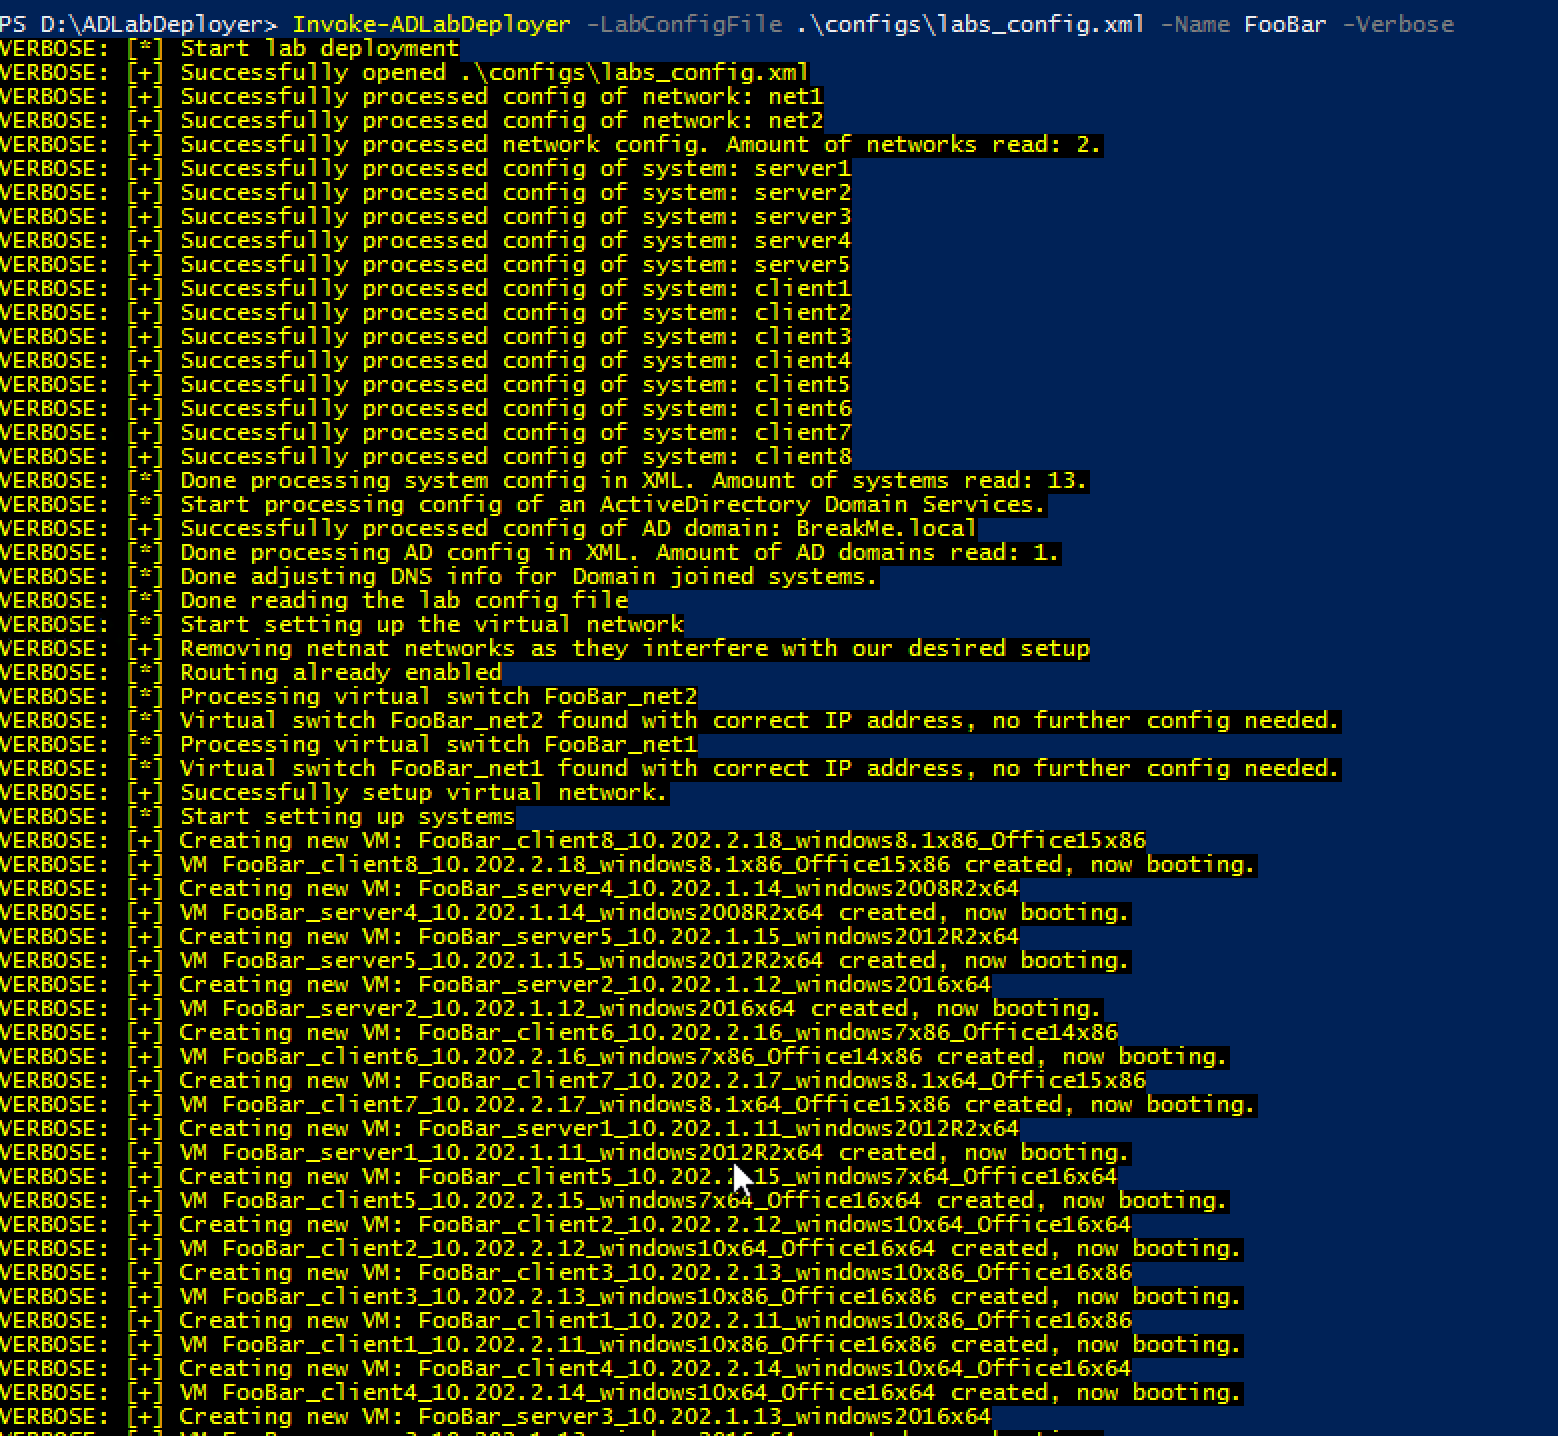
Read config, create network and systems, and boot
Then it will install the Active Directory domain controller, check if its successful and have clients join the domain.
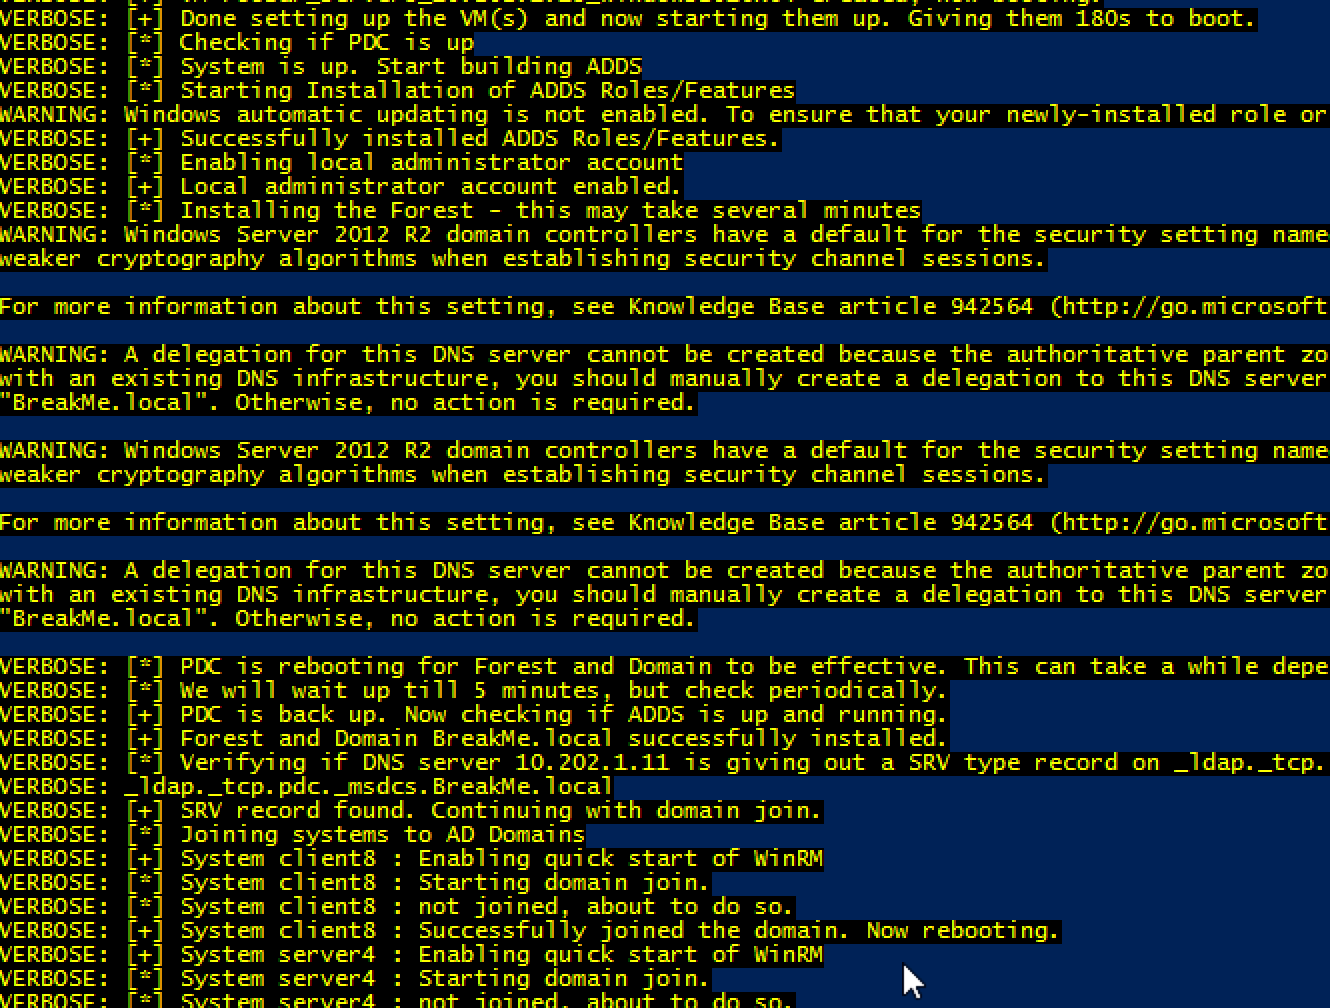
Domain actions
Finally it will iterate through all the systems and perform software installation (including Office) and final tuning based on smart things and config file parameters.
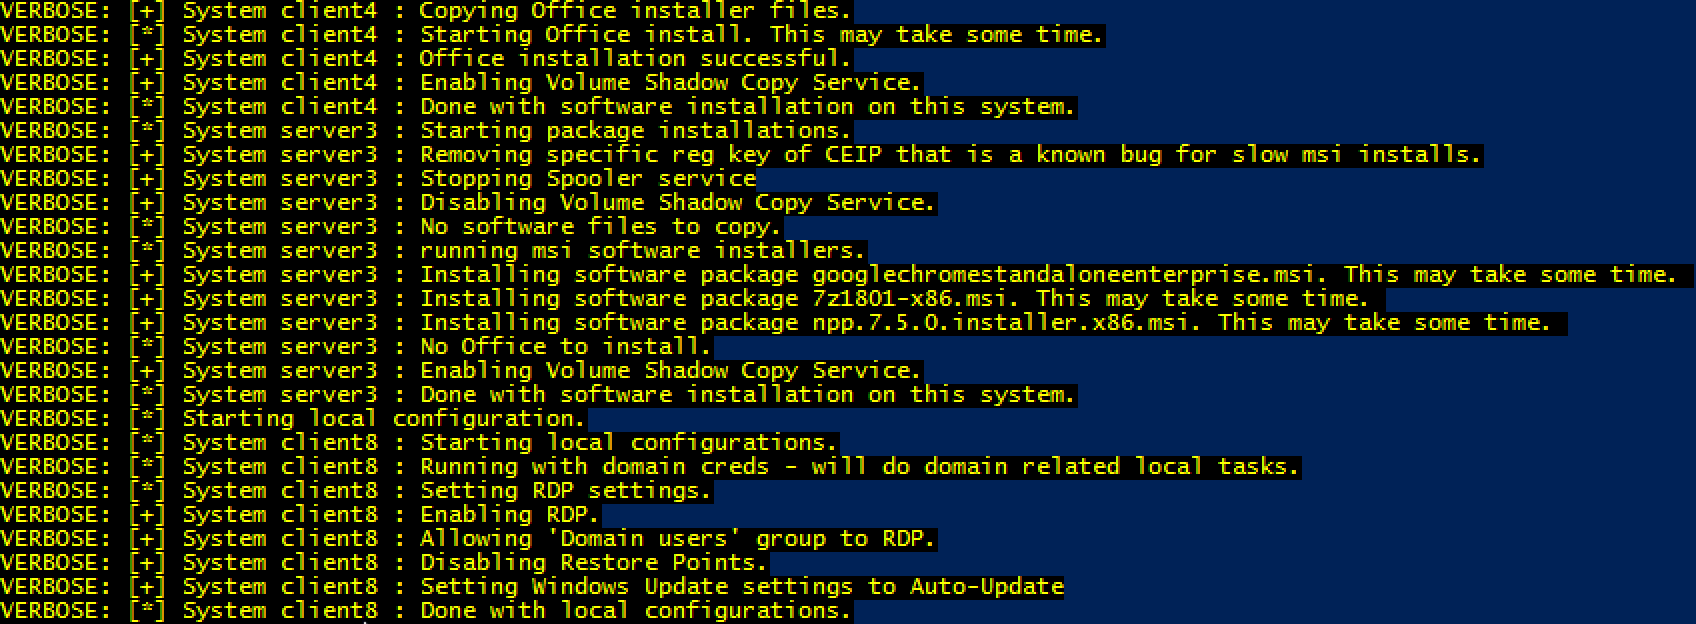
Software installation and final configuration
The total deployment speed is heavily depending on your hardware specs. But on our hardware a single system is deployed in a few minutes, while a 10-host network, with AD, and all hosts with Office and other tools installed, can take up to 40 minutes. Currently the code does not do any parallelisation. I might implement this in the future. But to be honest the deployment time is of lesser concern for us.
You can find the code on the project’s github. You can expect more updates in the near future. I very much welcome your code submissions. Or you can let me know your ideas via Twitter.
Thanks to University of Amsterdam students Fons Mijnen and Vincent van Dongen for following up on our initial idea with their research and PoC.